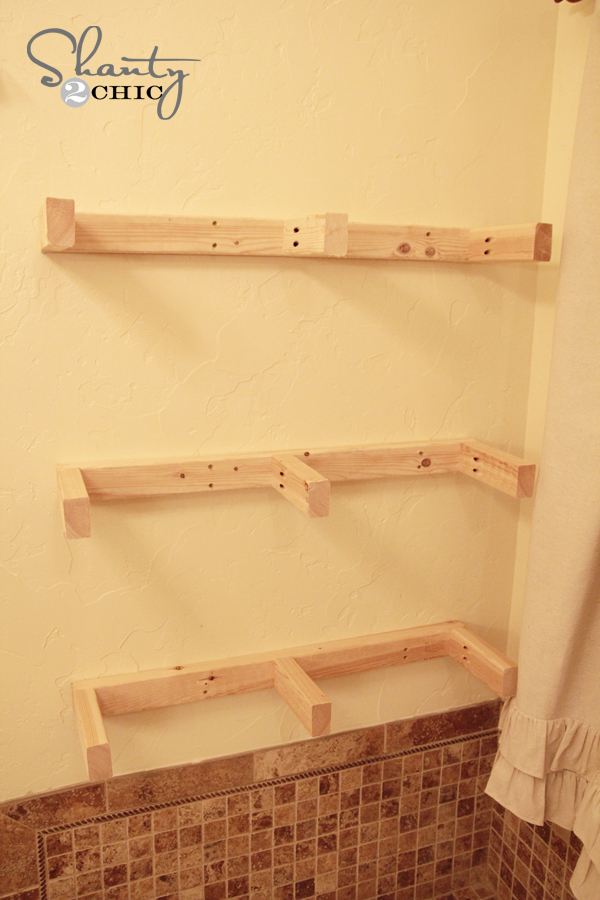
Building a Floating Shelf with Multiple Levels: A Step-by-Step Guide
Hey there, DIY enthusiasts! Are you looking to add some stylish storage and visual interest to your walls? Building a floating shelf with multiple levels can be a fantastic way to do just that. It's a project that's more achievable than you might think, even if you're a beginner. Let's dive in!
Materials You'll Need
First things first, gather your supplies. Here's what you'll need to get started:
- Wood for shelves: Choose a wood type that suits your style and desired level of durability. Pine, maple, and birch are popular choices. The thickness depends on the size and weight you want to support.
- Brackets: These are the hidden supports for your shelves. You can get decorative brackets for a more visible look, or discreet ones that blend in with the wall.
- Screws: Make sure to get screws that are the appropriate length and size for your chosen wood and brackets.
- Measuring tape: Essential for precise measurements.
- Level: Ensures your shelves are perfectly straight.
- Pencil: For marking your measurements on the wall.
- Drill: A power drill will make things much easier, especially if you're drilling into concrete or brick.
- Wood glue: For added stability and strength (optional).
- Sandpaper: To smooth out any rough edges after cutting the wood.
- Stain or paint: To give your shelves a desired finish.
Planning Your Design
Before you grab your saw, take some time to plan out the design of your floating shelves. Consider:
- Shelf width: Decide on a width that suits the space you're working with and the items you plan to store.
- Shelf depth: This is determined by the size of your brackets. Look for a depth that provides sufficient support for your items.
- Number of levels: How many shelves do you envision? Think about the height of your wall and the space between each shelf.
- Spacing: The distance between each level should allow for easy access and a visually pleasing arrangement. Remember, you can always customize this spacing later.
- Placement: Choose a wall location that complements your furniture and décor. Ensure the area is sturdy enough to support the weight of the shelves.
Building the Shelves
Let's start building! Follow these steps:
Step 1: Cutting the Wood
Measure and mark your wood for each shelf using a pencil and measuring tape. Be sure to cut your shelves to the exact size you want. If you don't have a saw, you can often get wood pre-cut at your local hardware store.
Step 2: Sanding
Once your shelves are cut, sand the edges and any rough surfaces with sandpaper. This helps to ensure a smooth finish and prevents splinters.
Step 3: Staining or Painting (Optional)
If you want to give your shelves a specific color, now's the time to stain or paint them. Let the finish dry completely before moving on.
Installing the Shelves
The installation process is key to ensuring your floating shelves are sturdy and look great.
Step 1: Marking the Wall
Choose your wall location, then carefully mark the placement of your brackets on the wall using a pencil and level. Remember to account for the depth of your brackets and the desired spacing between shelves.
Step 2: Pre-Drilling Holes
If you're drilling into concrete or brick, pre-drilling pilot holes with a slightly smaller drill bit than the screw size will make it easier to screw in the brackets.
Step 3: Attaching the Brackets
Position your brackets on the marked spots and secure them to the wall using screws. Be sure to use a level to ensure the brackets are straight and even.
Step 4: Positioning the Shelves
Carefully slide the shelves onto the brackets, ensuring a snug fit. Consider applying a thin layer of wood glue to the back of the shelves before placing them on the brackets for extra stability.
Step 5: Finishing Touches
Once your shelves are in place, you can add any decorative touches like shelf liners or small hooks. Step back and admire your handy work!
Commonly Asked Questions
Let's address some common questions you might have:
What if I want to hang heavier items on my shelves?
For heavier items, consider using stronger brackets and make sure to choose wood that can handle the weight. You can also use thicker wood for added strength.
Can I use floating shelves in the bathroom?
Absolutely! Choose waterproof wood like cedar or redwood for bathroom shelves, and use waterproof sealant on the wood to protect it from moisture.
How can I hide the bracket screws?
You can choose brackets that have hidden screw holes. If the screws are visible, you can cover them with paint or wood putty that matches the shelf color.
What if my walls are uneven?
If your walls aren't perfectly flat, you might need to use shims to level the brackets. You can purchase shims at most hardware stores.
And there you have it! Building a floating shelf with multiple levels is a great way to personalize your home. Remember, it's a process to enjoy. If you encounter any challenges, don't hesitate to reach out for help. Happy building!


No comments:
Post a Comment
Note: Only a member of this blog may post a comment.